Installing Ubuntu Precise 12.04 on a Udoo Quad

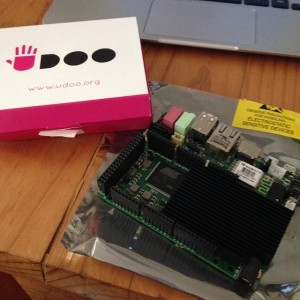
Udoo Quad

This is a quick post explaining how to install Ubuntu 12.04 on your Udoo Quad board (I’m sure the instructions can be easily adapted to the Dual unit as well).

The Udoo folks have made available two distributions, Linaro Ubuntu 11.10 and Android 4.22. The supplied Linaro distribution is very good, running what looks like Gnome 3 and comes with Chrome and Arduino IDE installed to get you started. If you want to just enjoy your Udoo then you could do a lot worse than sticking with the default distro.

Ubuntu Core

Canonical makes a very small version of Ubuntu called Ubuntu Core. Core is, as its name suggests, the bare minimum required to boot the OS.

As luck would have it there is a version for 12.04 for armhf so I thought I would see if I could get Ubuntu Core 12.04 running on the Udoo. There weren’t a lot of docs on the boot sequence for the Udoo, but I had enough experience with other Uboot based systems to figure out that Uboot is written directly to the start of the card, which then mounts your root partition and looks for the kernel there.

The first step is to download and dd the Udoo supplied image to a micro sd card and boot it up. I then did the same to a second micro sd card and connected that to the Udoo with a USB card reader.

There are probably ways to avoid having to use two cards, but as Ubuntu Core is so minimal it helps to have a running arm system that you can chroot to the Ubuntu 12.04 image and apt-get some more packages that will make it easier to work with (ie, there is no editor installed in the base Ubuntu Core image).

Once the Udoo is booted up using the Linaro 11.10 image, perform the following steps as root.

Erase the root partition on the target sdcard and mount it.

# mkfs.ext3 -L udoo_linux /dev/sda1
# mount /dev/sda1 /mnt

Unpack the Ubuntu Core distro onto the target

# curl http://cdimage.ubuntu.com/ubuntu-core/releases/12.04/release/ubuntu-core-12.04.3-core-armhf.tar.gz | tar -xz -C /mnt

Next you need to copy the kernel and modules from the Linaro 11.10 image

# cp -rp /boot/uImage /mnt/boot/
# cp -rp /lib/modules/* /mnt/lib/modules/

At this point the new Ubuntu 12.04 image is ready to go, but it is a very spartan environment so I recommend the following steps

# chroot /mnt
# adduser $SOMEUSER
# adduser $SOMEUSER adm
# adduser $SOMEUSER sudo
# apt-get update
# apt-get install sudo vim-tiny net-tools # and any other packages you want

Fixing the console

The Udoo serial port operates at 115200 baud, but by default the Ubuntu Core image is not configured to take over on /dev/console at the correct baud. The simplest solution to fix this is

# cp /etc/init/tty1.conf /etc/init/console.conf

Edit /etc/init/console and change the last line to

exec /sbin/getty -8 115200 console

And that is it, exit your chroot

# exit

Unmount your 12.04 partition

# umount /mnt
# sync

Shutdown your Udoo, take out the Linaro 11.10 image, insert your 12.04 image and hit the power button. If everything worked you should see a login prompt on the screen, if you have connected a HDMI monitor, and the serial port if you’ve connected the port up (recommended).

After that, login as the user you added above, sudo to root and finish your setup of the host.

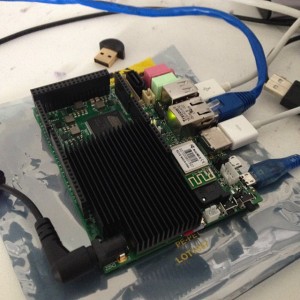
Udoo quad hooked up and runningOh, and in case you were wondering, early Go benchmarks put this board about 20% faster than my old Pandaboard Dual A9 and 10% faster than my recently acquired Cubieboard A7 powered hardware.

One feature I really appreciate is the onboard serial (UART) to USB adapter which means you can get access to the serial console on the Udoo with nothing more than a USB A to Micro B cable.

How does the go build command work ?

This post explains how the Go build process works using examples from Go’s standard library.

The gc toolchain

This article focuses on the gc toolchain. The gc toolchain takes its name for the Go compiler frontend, cmd/gc, and is mainly used to distinguish it from the gccgo toolchain. When people talk about the Go compilers, they are likely referring to the gc toolchain. This article won’t be focusing on the gccgo toolchain.

The gc toolchain is a direct descendant of the Plan 9 toolchain. The toolchain consists of a Go compiler, a C compiler, an assembler and a linker. Each of these tools are found in the src/cmd/ subdirectory of the Go source and consist of a frontend, which is shared across all implementations, and a backend which is specific to the processor architecture. The backends are distinguished by their letter, which is again a Plan 9 tradition. The commands are:

  • 5g, 6g, and 8g are the compilers for .go files for arm, amd64 and 386
  • 5c, 6c, and 8c are the compilers for .c files for arm, amd64 and 386
  • 5a, 6a, and 8a are the assemblers for .s files for arm, and64 and 386
  • 5l, 6l, and 8l are the linkers for files produced by the commands above, again for arm, amd64 and 386.

It should be noted that each of these commands can be compiled on any supported platform and this forms the basis of Go’s cross compilation abilities. You can read more about cross compilation in this article.

Building packages

Building a Go package involves at least two steps, compiling the .go files then packing the results into an archive. In this example I’m going to use crypto/hmac as it is a small package, only one source and one test file. Using the -x option I’ve asked go build to print out every step as it executes them

% go build -x crypto/hmac
WORK=/tmp/go-build249279931
mkdir -p $WORK/crypto/hmac/_obj/
mkdir -p $WORK/crypto/
cd /home/dfc/go/src/pkg/crypto/hmac
/home/dfc/go/pkg/tool/linux_arm/5g -o $WORK/crypto/hmac/_obj/_go_.5 -p crypto/hmac -complete -D _/home/dfc/go/src/pkg/crypto/hmac -I $WORK ./hmac.go
/home/dfc/go/pkg/tool/linux_arm/pack grcP $WORK $WORK/crypto/hmac.a $WORK/crypto/hmac/_obj/_go_.5

Stepping through each of these steps

WORK=/tmp/go-build249279931
mkdir -p $WORK/crypto/hmac/_obj/
mkdir -p $WORK/crypto/

go build creates a temporary directory, /tmp/go-build249279931 and populates it with some skeleton subdirectories to hold the results of the compilation. The second mkdir may be redundant, issue 6538 has been created to track this.

cd /home/dfc/go/src/pkg/crypto/hmac
/home/dfc/go/pkg/tool/linux_arm/5g -o $WORK/crypto/hmac/_obj/_go_.5 -p crypto/hmac -complete -D _/home/dfc/go/src/pkg/crypto/hmac -I $WORK ./hmac.go

The go tool switches the the source directory of crypto/hmac and invokes the go compiler for this architecture, in this case 5g. In reality there is no cd, /home/dfc/go/src/pkg/crypto/hmac is the supplied as the exec.Command.Dir field when 5g is executed. This means the .go source files can be relative to their source directory, making the command line shorter.

The compiler produces a single temporary output file in $WORK/crypto/hmac/_obj/_go_.5 which will be used in the final step.

/home/dfc/go/pkg/tool/linux_arm/pack grcP $WORK $WORK/crypto/hmac.a $WORK/crypto/hmac/_obj/_go_.5

The final step is to pack the object file into an archive file, .a, which the linker and the compiler consume.

Because we invoked go build on a package, the result is discarded as $WORK is deleted after the build completes. If we invoke go install -x two additional lines appear in the output

mkdir -p /home/dfc/go/pkg/linux_arm/crypto/
cp $WORK/crypto/hmac.a /home/dfc/go/pkg/linux_arm/crypto/hmac.a

This demonstrates the difference between go build and install; build builds, install builds then installs the result to be used by other builds.

Building more complex packages

You may be wondering what the pack step in the previous example does. As the compiler and linker only accept a single file representing the contents of the package, if a package contains multiple object files, they must be packed into a single .a archive before they can be used.

A common example of a package producing more than one intermediary object file is cgo, but that is too complicated for this article, instead a simpler example is a package that contains some .s assembly files, like crypto/md5.

% go build -x crypto/md5
WORK=/tmp/go-build870993883
mkdir -p $WORK/crypto/md5/_obj/
mkdir -p $WORK/crypto/
cd /home/dfc/go/src/pkg/crypto/md5
/home/dfc/go/pkg/tool/linux_amd64/6g -o $WORK/crypto/md5/_obj/_go_.6 -p crypto/md5 -D _/home/dfc/go/src/pkg/crypto/md5 -I $WORK ./md5.go ./md5block_decl.go
/home/dfc/go/pkg/tool/linux_amd64/6a -I $WORK/crypto/md5/_obj/ -o $WORK/crypto/md5/_obj/md5block_amd64.6 -D GOOS_linux -D GOARCH_amd64 ./md5block_amd64.s
/home/dfc/go/pkg/tool/linux_amd64/pack grcP $WORK $WORK/crypto/md5.a $WORK/crypto/md5/_obj/_go_.6 $WORK/crypto/md5/_obj/md5block_amd64.6

In this example, executed on a linux/amd64 host, 6g is invoked to compile two .go files, md5.go and md5block_decl.go. The latter contains the forward declaration for the functions implemented in assembly.

6a is then invoked to assemble md5block_amd64.s. The logic for choosing which .s to compile is described in my previous article on conditional compilation.

Finally pack is invoked to pack the Go object file, _go_.6, and the assembly object file, md5block_amd64.6, into a single archive.

Building commands

A Go command is a package who’s name is main. Main packages, or commands, are compiled just like other packages, but then undergo several additional steps to be linked into final executable. Let’s investigate this process with cmd/gofmt

% go build -x cmd/gofmt
WORK=/tmp/go-build979246884
mkdir -p $WORK/cmd/gofmt/_obj/
mkdir -p $WORK/cmd/gofmt/_obj/exe/
cd /home/dfc/go/src/cmd/gofmt
/home/dfc/go/pkg/tool/linux_amd64/6g -o $WORK/cmd/gofmt/_obj/_go_.6 -p cmd/gofmt -complete -D _/home/dfc/go/src/cmd/gofmt -I $WORK ./doc.go ./gofmt.go ./rewrite.go ./simplify.go
/home/dfc/go/pkg/tool/linux_amd64/pack grcP $WORK $WORK/cmd/gofmt.a $WORK/cmd/gofmt/_obj/_go_.6
cd .
/home/dfc/go/pkg/tool/linux_amd64/6l -o $WORK/cmd/gofmt/_obj/exe/a.out -L $WORK $WORK/cmd/gofmt.a
cp $WORK/cmd/gofmt/_obj/exe/a.out gofmt

The first six lines should be familiar, main packages are compiled like any other Go package, they are even packed like any other package.

The difference is the penultimate line, which invokes the linker to produce a binary executable.

/home/dfc/go/pkg/tool/linux_amd64/6l -o $WORK/cmd/gofmt/_obj/exe/a.out -L $WORK $WORK/cmd/gofmt.a

The final line copies and renames the completed binary to its final name. If you had used go install the binary would be copied to $GOPATH/bin (or $GOBIN if set).

A little history

If you go far enough back in time, back before the go tool, back to the time of Makefiles, you can still find the core of the Go compilation process. This example is taken from the release.r60 documentation

$ cat >hello.go <<EOF
package main

import "fmt"

func main() {
        fmt.Printf("hello, world\n")
}
EOF
$ 6g hello.go
$ 6l hello.6
$ ./6.out
hello, world

It’s all here, 6g compiling a .go file into a .6 object file, 6l linking the object file against the fmt (and runtime) packages to produce a binary, 6.out.

Wrapping up

In this post we’ve talked about how go build works and touched on how go install differs in its treatment of the compilation result.

Now that you know how go build works, and how to investigate the build process with -x, try passing that flag to go test and observe the result.

Additionally, if you have gccgo installed on your system, you can pass -compiler gccgo to go build, and using -x investigate how Go code is built using this compiler.

How to use conditional compilation with the go build tool

When developing Go packages that rely on specific features of the underlying platform or processor it is often necessary to provide a specialised implementation.

Go does not have a preprocessor, a macro system, or a #define declaration to control the inclusion of platform specific code. Instead a system of tags and naming convention defined in the go/build package and supported by the go tool allows Go packages to customise themselves for the specific platform they are being compiled for.

This post explains how conditional compilation is implemented and show you how you can use it in your projects.

But first, go list

Before we can talk about conditional compilation, we need to learn a little bit about the go list command. go list gives you access to the internal data structures which power the build process.

go list takes the most of the same arguments as go build, test, and install but does not perform any compilation. Using the -f, format flag we can supply a snippet of text/template code which is executed in a context containing a go/build.Package structure.

Using the format flag, we can ask go list to tell us the names of the files that would be compiled.

% go list -f '{{.GoFiles}}' os/exec
[exec.go lp_unix.go]

In the example above I asked for the list of files in os/exec package that would be compiled on this linux/arm system. The result is two files, exec.go which contains the common code shared across all platforms, and lp_unix.go while contains an implementation of exec.LookPath for unix-like systems.

If I were to run the same command on a Windows system, the result would be

C:\go> go list -f '{{.GoFiles}}' os/exec
[exec.go lp_windows.go]

This short example demonstrates the two parts of the Go conditional compilation system, known as Build Constraints, which we will now explore in more detail.

Build tags

The first method of conditional compilation is via an annotation in the source code, commonly known as a build tag.

Build tags are implemented as comments and should appear as close to the top of the file as possible.

When go build is asked to build a package it will analyse each source file in the package looking for build tags. These tags control whether go build will pass the file to the compiler.

A build tags follow these three rules

  1. a build tag is evaluated as the OR of space-separated options
  2. each option evaluates as the AND of its comma-separated terms
  3. each term is an alphanumeric word or, preceded by !, its negation

As an example, the build tag found at the top of a source file

// +build darwin freebsd netbsd openbsd

would constrain this file to only building on BSD systems that supported kqueue.

A file may have multiple build tags. The overall constraint is the logical AND of the individual constraints. For example

// +build linux darwin
// +build 386

constrains the build to linux/386 or darwin/386 platforms only.

A note about comments

One thing that generally catches people out when they are first trying to make build tags work is this

// +build !linux
package mypkg // wrong

In this example there is no newline separating the build tag and the package declaration. Because of this the build tag is associated with the package declaration as a comment describing the package and thus ignored.

// +build !linux

package mypkg // correct

This is the correct form, a comment with a trailing newline stands alone and is not associated with any declaration and go vet will detect the missing newline.

% go vet mypkg
mypkg.go:1: +build comment appears too late in file
exit status 1

When this feature was added to go vet it detected several mistakes in the standard library and sub repos, so don’t feel bad if you get it wrong the first time.

For reference, here is a sample showing a licence preamble, a build tag, and a package declaration

% head headspin.go 
// Copyright 2013 Way out enterprises. All rights reserved.
// Use of this source code is governed by a BSD-style
// license that can be found in the LICENSE file.

// +build someos someotheros thirdos,!amd64

// Package headspin implements calculates numbers so large
// they will make your head spin.
package headspin

File suffixes

The second option for providing conditional compilation is the name of the source file itself. This scheme is simpler than build tags, and allows the go/build package to exclude files without having to process the file.

The naming convention is described in the documentation for the go/build package. Simply put, if your source file includes the suffix, _$GOOS.go then it will only be built on that platform. All other platforms will behave as if the file is not present. The same applies for _$GOARCH.go. The two can be combined as _$GOOS_$GOARCH.go, but not _$GOARCH_$GOOS.go.

Some examples of file suffixes are,

mypkg_freebsd_arm.go // only builds on freebsd/arm systems
mypkg_plan9.go       // only builds on plan9

Your source files still require a name, a suffix is not sufficient, for example

_linux.go
_freebsd_386.go

will be ignored, even on linux or freebsd systems, because the go/build package ignores any file beginning with a period or an underscore.

Choosing between build tags and file suffixes

Build tags and file suffixes overlap in fuctionality. For example, a file called mypkg_linux.go that contained the build tag // +build linux is redundant.

In general, when choosing between a build tag or a file suffix, you should choose a file suffix when there is an exact match between the platform or architecture and the file you want to include. eg,

mypkg_linux.go         // only builds on linux systems
mypkg_windows_amd64.go // only builds on windows 64bit platforms

Conversely if your file is applicable to more than one platform or architecture, or you need to exclude a specific platform, a build tag should be used. eg,

% grep '+build' $HOME/go/src/pkg/os/exec/lp_unix.go 
// +build darwin dragonfly freebsd linux netbsd openbsd

builds on all unix like platforms.

% grep '+build' $HOME/go/src/pkg/os/types_notwin.go 
// +build !windows

builds on all platforms except Windows.

Wrapping up

While this post has focused only on Go source files, build tags and file suffixes can be used with any source file that the go tool can build. This includes .c and .s files. The Go standard library, specifically the runtime, syscall, os and net packages contain great examples, I recommend studying them.

Test files also support build tags and file suffixes and behave in the same manner as Go source files, conditionally including test cases on a per platform basis. Again the standard library contains many great examples.

Finally, while the title of this article talks about the go tool, the conditional compilation features are not limited to just that tool. You can build your own tools to consume and analyse Go code with the same file suffix and build tag semantics using the go/build package.
Why I think Go package management is important

One of the stated goals of Go was to provide a language which could be built without Makefiles or other kinds of external configuration. This was realised with the release of Go 1, and the go tool which incorporated an earlier tool, goinstall, as the go get subcommand.

go get uses a cute convention of embedding the remote location of the package’s source in the import path of the package itself. In effect, the import path of the package tells go get where to find the package, allowing the dependency tree a package requires to be discovered and fetched automatically.

Compared to Go’s contemporaries, this solution has been phenomenally successful. Authors of Go code are incentivised to make there code go getable, in much the same way peer pressure drives them to go fmt their code. The installation instructions for most of the Go code you find on godoc and go-search has become, in essence, go get $REPO.

So, what is the problem?

Despite the significant improvement over some other language’s built in dependency management solutions, many Go developers are disappointed when the discover the elegance of go get is a double edged sword.

The Go import declaration references an abstract path. If this abstract path represents to a remote DVCS repository, the declaration alone does not contain sufficient information to identify which particular revision should be fetched. In almost all cases go get defaults to head/tip/trunk/master, although there is a provision for fetching from a tag called go1.

The Go Authors recognize that this is an issue, and suggest that if you need this level of control over your dependencies you should consider using alternative tools, suggesting goven as a possible solution.

Over the past two years no fewer than 19 other tools have been announced, so there is clearly a need and a desire to solve the problem. That said, none of them have achieved significant mind share, let alone challenged go get for the title of default.

Making it personal

Here are three small examples from my work life where go get isn’t sufficient for our requirements as we deliver our rewrite of Juju in Go.

Keeping the team on the same page

Juju isn’t just one project, but more than a dozen projects that we have written or rely on. Often landing a fix or feature in Juju means touching one of these upstream libraries and then making a corresponding change in Juju.

Sometimes these changes make it easy for other developers on the team to detect that they don’t have the correct version of a dependency as Juju stops compiling. Other times the effects can be more subtle, a bug fix to a library can cause no observed breakage so there is no signal to others on the team that they are compiling against the wrong version of the package.

To date, we’ve resorted to an email semaphore whenever someone fixes a bug a package, imploring everyone else to run go get -u. You can probably imagine how successful this is, and how much time is being spent chasing bugs that were already fixed.

Reproducible builds

As a maintenance programmer on Juju, I regularly switch between stable, trunk and feature branches. Each of those expects to be compiled against exactly the right version of its dependencies, but go get doesn’t provide any way of capturing this so I may reliably reproduce a build of Juju from the past.

Being a good Debian citizen

As our product eventually ends up inside Debian based distributions we have to deliver a release artifact which relies only on other Debian packages in the archive. We currently do this with a blob of shell scripts and tags on repos that we control to produce a tarball that contains the complete $GOPATH of all the source for Juju and its dependencies for exactly this release.

While it gets the job done, our pragmatism is not winning us any favors with our Debian packaging overlords as our approach makes their security tin foil hats itch. We’ve been lucky so far, but will probably at some point have a security issue in a package that Juju depends on, and because that package has been copied into every release artifact we’ve delivered fixing it will be a very involved process.

What to do?

Recently William Kennedy, Nathan Youngman and I started a Google Group in the hope of harnessing these disparate efforts of the many people who have thought, argued, hit their head against, and worked on this problem.

If you care about this issue, please consider joining the [go-pm] mailing list and contributing to the Goals document. I am particularly interested in capturing the requirements of various consumers of Go packages via user stories.

Simple test coverage with Go 1.2

Did you know that Go 1.2 will ship with a built in test coverage tool ? The tool is integrated into go test and works similarly to the profiling tool, producing an output file which is interpreted by a second command.

If you have Go 1.2rc2 or tip installed, you can use this short shell function to automate the basic usage of the cover tool to produce a per function coverage breakdown.

cover () { 
    t=$(tempfile)
    go test -coverprofile=$t $@ && go tool cover -func=$t && unlink $t
}

Usage is straight forward, just call cover with no argument for the package in your current working directory, or pass the name of a package.

% cover bytes
ok      bytes   7.770s  coverage: 91.6% of statements
bytes/buffer.go:        Bytes                   100.0%
bytes/buffer.go:        String                  100.0%
bytes/buffer.go:        Len                     100.0%
bytes/buffer.go:        Truncate                100.0%
bytes/buffer.go:        Reset                   100.0%
bytes/buffer.go:        grow                    100.0%
bytes/buffer.go:        Grow                    100.0%
bytes/buffer.go:        Write                   100.0%
bytes/buffer.go:        WriteString             100.0%
bytes/buffer.go:        ReadFrom                94.7%
bytes/buffer.go:        makeSlice               75.0%
bytes/buffer.go:        WriteTo                 78.6%
bytes/buffer.go:        WriteByte               100.0%
bytes/buffer.go:        WriteRune               100.0%
bytes/buffer.go:        Read                    100.0%
bytes/buffer.go:        Next                    100.0%
bytes/buffer.go:        ReadByte                100.0%
bytes/buffer.go:        ReadRune                83.3%
bytes/buffer.go:        UnreadRune              85.7%
bytes/buffer.go:        UnreadByte              100.0%
bytes/buffer.go:        ReadBytes               100.0%
bytes/buffer.go:        readSlice               100.0%
bytes/buffer.go:        ReadString              100.0%
bytes/buffer.go:        NewBuffer               100.0%
bytes/buffer.go:        NewBufferString         100.0%
bytes/bytes.go:         equalPortable           100.0%
bytes/bytes.go:         explode                 100.0%
bytes/bytes.go:         Count                   100.0%
bytes/bytes.go:         Contains                0.0%
bytes/bytes.go:         Index                   100.0%
bytes/bytes.go:         indexBytePortable       100.0%
bytes/bytes.go:         LastIndex               100.0%
bytes/bytes.go:         IndexRune               100.0%
bytes/bytes.go:         IndexAny                100.0%
bytes/bytes.go:         LastIndexAny            100.0%
bytes/bytes.go:         genSplit                100.0%
bytes/bytes.go:         SplitN                  100.0%
bytes/bytes.go:         SplitAfterN             100.0%
bytes/bytes.go:         Split                   100.0%
bytes/bytes.go:         SplitAfter              100.0%
bytes/bytes.go:         Fields                  100.0%
bytes/bytes.go:         FieldsFunc              100.0%
bytes/bytes.go:         Join                    100.0%
bytes/bytes.go:         HasPrefix               100.0%
bytes/bytes.go:         HasSuffix               100.0%
bytes/bytes.go:         Map                     100.0%
bytes/bytes.go:         Repeat                  100.0%
bytes/bytes.go:         ToUpper                 100.0%
bytes/bytes.go:         ToLower                 100.0%
bytes/bytes.go:         ToTitle                 100.0%
bytes/bytes.go:         ToUpperSpecial          0.0%
bytes/bytes.go:         ToLowerSpecial          0.0%
bytes/bytes.go:         ToTitleSpecial          0.0%
bytes/bytes.go:         isSeparator             80.0%
bytes/bytes.go:         Title                   100.0%
bytes/bytes.go:         TrimLeftFunc            100.0%
bytes/bytes.go:         TrimRightFunc           100.0%
bytes/bytes.go:         TrimFunc                100.0%
bytes/bytes.go:         TrimPrefix              100.0%
bytes/bytes.go:         TrimSuffix              100.0%
bytes/bytes.go:         IndexFunc               100.0%
bytes/bytes.go:         LastIndexFunc           100.0%
bytes/bytes.go:         indexFunc               100.0%
bytes/bytes.go:         lastIndexFunc           100.0%
bytes/bytes.go:         makeCutsetFunc          100.0%
bytes/bytes.go:         Trim                    100.0%
bytes/bytes.go:         TrimLeft                100.0%
bytes/bytes.go:         TrimRight               100.0%
bytes/bytes.go:         TrimSpace               100.0%
bytes/bytes.go:         Runes                   100.0%
bytes/bytes.go:         Replace                 100.0%
bytes/bytes.go:         EqualFold               100.0%
bytes/reader.go:        Len                     100.0%
bytes/reader.go:        Read                    100.0%
bytes/reader.go:        ReadAt                  100.0%
bytes/reader.go:        ReadByte                0.0%
bytes/reader.go:        UnreadByte              0.0%
bytes/reader.go:        ReadRune                0.0%
bytes/reader.go:        UnreadRune              0.0%
bytes/reader.go:        Seek                    91.7%
bytes/reader.go:        WriteTo                 83.3%
bytes/reader.go:        NewReader               100.0%
total:                  (statements)            91.6%

Two point five ways to access the serial console on your Beaglebone Black

Introduction

I recently purchased a Beaglebone Black (BBB) as a replacement for a Raspberry Pi which was providing the freebsd/arm builder for the Go build dashboard. Sadly the old RPi didn’t work out. I’m hoping the BBB will be a better match, faster, and more reliable.

The BBB is a substantial upgrade to the original Beaglebone for a couple of reasons.

The first is obviously the price. At less than $50 bucks AUD in my hand, it offers substantially better value for money than the original BB. This drive towards a lower price point is clearly a reaction to Arduinos and the Raspberry Pi. Having now owned both I can see the value the original BB offered, it’s a much better integrated package, but newcomers to embedded systems will vote with their wallets.

Secondly, the new BBB comes with 512mb of RAM onboard, up from the 256mb of its predecessor. For a freebsd/arm builder, this is very important. You also get 2gb of eMMc flash onboard, which comes preinstalled with Angstrom Linux.

Lastly, the processor has been bumped from 720Mhz to 1Ghz, providing you can provide sufficient current.

Of the original Beaglebone features that were cut were JTAG and serial over USB. This last point, the lack of a serial port, is the focus of the remainder of this article.

The serial pins on your Beaglebone Black

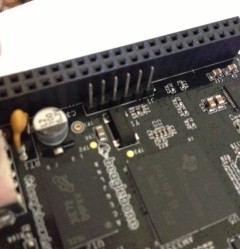
J1 serial port header

J1 serial port header

The Beaglebone Black serial port is available via the J1 header. This picture is upside down with respect to the pin numbers, pin 1 is on the right and pin 6 is on the left.

Method number one, the FTDI USB to Serial adapter.

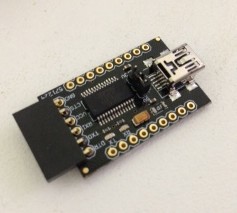
The first, simplest, and most recommended method of connecting to your BBB is via an FTDI USB to Serial adapter. These come in all shapes and sizes, some built into the USB A plug, others like this one are just the bare board. If you’ve done any Arduino programming you’ve probably got a slew of these little things in your kit. I got mine from Little Bird Electronics for $16 bucks.

DFRobot FTDI USB to Serial adapter

DFRobot FTDI USB to Serial adapter

The FTDI adapter can do more than just level convert between USB and the BBB’s 3.3 volt signals. This one can provide power from the USB host at either 3.3 or 5 volt as well as provides breakouts for the other RS232 signals.

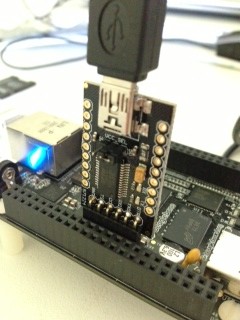
Normally avoiding the power supply built into the FTDI adapter would be a problem, but the designers of the BBB have already thought of this and made it super simple to directly connect the FTDI adapter, or cable, to the BBB.

FTDI adapter mounted on the J1 header

Simply put, although the male header on the BBB matches the FTDI adapter, only pins 1, 4 and 5 are actually connected on the board. This means you don’t have to worry about Vcc on pin 3 of the FTDI adapter as the pin on the BBB is not connected.

Method number two, Prolific PL2303 USB to Serial adapter

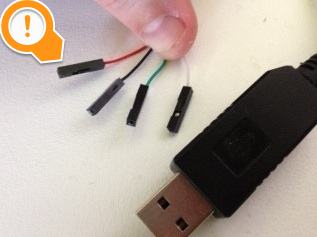
PL2303 showing the +5v lead

This is the no no wire

The second method is similar to the previous, but this time using a Prolific Technologies PL2303 USB to Serial cable. This cable is very common if you’ve used the Raspberry Pi. I got my first one from Adafruit, but I’ve since received a few more as part of other dev board kits. You can even make your own by cutting the ends of old Nokia DKU-5 cables. Irrespective all the cables use the Prolific Technology PL2303 chipset.

The drawback of the PL2303 is the red wire, this carries +5v from the USB port and can blow the arse out of your BBB. Strictly speaking it can blow up you RPi with this cable if you aren’t careful, but in the case of the BBB, there is no safe pin to connect it; you must leave it unconnected.

PL2303 showing the +5v lead unconnected

To hook up your BBB using the PL2303 connect the black, ground lead to pin 1 on the J1 header, the green RX lead to pin 4, and the white TX lead to pin 5.

Do not connect the red lead to anything!

Method three, using a Bus Pirate as serial passthrough

Bus Pirate in UART passthrough mode

Bus Pirate in UART pass through mode

This last method isn’t really practical as most people are unlikely to have a Bus Pirate, or if they do, they’ll probably also have an FTDI or PL2303 cable knocking about.

Connect the Bus Pirate as described on this page for UART mode, connect to the BP over your serial connectoin, then type this set of commands

m # to set the mode
3 # for UART mode
9 # for 115,200 bps
1 # for 8 bits, no parity
1 # for 1 stop bit
1 # for idle 1 receive polarity
2 # for normal, 3.3v output
(1) # for Transparent bridge mode
y # to start the bridge mode

Connecting to the serial console

Independent of which method to wire up your serial console, you’ll need to connect to it with some terminal software. I recommend using screen(1) for this, although some people prefer minicom(1). If you’re on Windows I think your options are limited to Teraterm Pro, but that is about all I know.

Using screen is as simple as

% sudo screen $USBDEVICE 115200

Which will start a new screen session at the almost universal speed of 115200 baud. The name of your USB device depends on your operating system. To quit screen, hit control-a then k.

Drivers

If you are using Linux, every modern distribution has drivers for the PL2302 and FTDI, nothing is required, but check dmesg(1) for the name of your device.

If you are using OS X, you will neither device is supported out of the box so you will have to download and install the drivers.

Devices names

  • On Linux, the device will be /dev/ttyUSB0 reguardless of the type of cable you are using.
  • On OS X, the name of the device depends on its driver.
    • For the FTDI driver, the device will start with /dev/tty.usbserial, eg, tty.usbserial-AD01U7TH.
    • For the PL2303 driver, the device will start with /dev/tty.PL2303, eg. tty.PL2303-000012FD.

Wrapping it up

I’m really impressed with the Beaglebone Black. While not as powerful as something like a Odroid-X2, or Pandaboard, the integration and out of the box experience is very compelling. Little touches like the layout of the J1 serial header give me confidence that the designers didn’t just aim for the lowest price point throwing quality to the wind; Cubieboard, I’m looking at you.

Should I actually get freebsd/arm up and building on the BBB, I’ll make a separate post about that.

#golang tweet popularity

Clearly I’m biased when it comes to the popularity of Go, so here is another data point.

[line_chart title=”#golang tweets per month” v_title=”tweets” width=”600px” height=”400px” scale_button=”true”]
[‘Month’, ‘Tweets’],
[ ‘2009-11’ , 60 ],
[ ‘2009-12’ , 31 ],
[ ‘2010-01’ , 14 ],
[ ‘2010-02’ , 36 ],
[ ‘2010-03’ , 56 ],
[ ‘2010-04’ , 57 ],
[ ‘2010-05’ , 62 ],
[ ‘2010-06’ , 81 ],
[ ‘2010-07’ , 149 ],
[ ‘2010-08’ , 106 ],
[ ‘2010-09’ , 225 ],
[ ‘2010-10’ , 139 ],
[ ‘2010-11’ , 219 ],
[ ‘2010-12’ , 102 ],
[ ‘2011-01’ , 173 ],
[ ‘2011-02’ , 204 ],
[ ‘2011-03’ , 258 ],
[ ‘2011-04’ , 251 ],
[ ‘2011-05’ , 694 ],
[ ‘2011-06’ , 557 ],
[ ‘2011-07’ , 393 ],
[ ‘2011-08’ , 444 ],
[ ‘2011-09’ , 401 ],
[ ‘2011-10’ , 456 ],
[ ‘2011-11’ , 385 ],
[ ‘2011-12’ , 369 ],
[ ‘2012-01’ , 344 ],
[ ‘2012-02’ , 558 ],
[ ‘2012-03’ , 877 ],
[ ‘2012-04’ , 508 ],
[ ‘2012-05’ , 450 ],
[ ‘2012-06’ , 656 ],
[ ‘2012-07’ , 782 ],
[ ‘2012-08’ , 785 ],
[ ‘2012-09’ , 1132 ],
[ ‘2012-10’ , 1052 ],
[ ‘2012-11’ , 773 ],
[ ‘2012-12’ , 888 ],
[ ‘2013-01’ , 970 ],
[ ‘2013-02’ , 1439 ],
[ ‘2013-03’ , 1478 ],
[ ‘2013-04’ , 1917 ],
[ ‘2013-05’ , 4714 ],
[ ‘2013-06’ , 5891 ],
[ ‘2013-07’ , 6599 ],
[ ‘2013-08’ , 6886 ]
[/line_chart]

Data courtesy of trendsmap

Release candidate 1 tarballs for ARM now available

Go 1.2 is on target for a December release and the Go team have just cut their first release candidate.

You can find the draft (no twitterverse, Go 1.2 isn’t released yet) release notes for Go 1.2 online here.

I have updated my unofficial ARM tarball distributions page with prebuilt go1.2rc1 tarballs. You can find them by following the link in the main header of this page.

If you are interested in following the performance improvements in Go 1.2, you may be interested in my autobench project.

Using Juju to build gccgo

The port of Juju to Go is a project I’ve been involved in at Canonical for some time now. The power behind Juju is charms, which are part configuration management and part reliable workflow engine.

One non-conventional use of Juju is something I cooked up a while ago when traveling, a Juju charm that compiles gccgo. This charm can be used to compile gccgo on a powerful instance in your cloud rather than on your puny laptop without having to worry about finding all the various dependencies that a modern gcc build requires.

The gccgo charm encapsulates all the instructions in http://golang.org/doc/install/gccgo, all you need to do is deploy it and wait for the result.

Getting started

To get started using the gccgo charm, checkout my charms repository from GitHub.

% cd $HOME
% git clone https://github.com/davecheney/charms

Bootstrap a juju environment

Each Juju service (an instance of a charm) needs to be deployed into a running environment. I’ve bootstrapped an environment on Amazon AWS as they have a nice 8 core machine which will get the job done quickly.

% juju bootstrap -e ap-southeast-2

Deploying the gccgo charm

The next step is to deploy an instance of the gccgo charm from my local charm repository. By default Juju requests the equivalent of an m1.small so we use a deploy time constraint to request a machine with a larger number of cores. The gccgo charm automatically adjusts itself to use all CPUs on the target machine.

% juju deploy --constraints "cpu-cores=8" --repository $HOME/charms \
     local:raring/gccgo

Monitoring the status of the build

All the magic of the build phase takes place in the hooks/start hook, so the build will stay at installed until the build completes (or fails).

% juju status gccgo
environment: ap-southeast-2
machines:
  "1":
    agent-state: started
    agent-version: 1.15.0.1
    dns-name: ec2-54-253-4-102.ap-southeast-2.compute.amazonaws.com
    instance-id: i-22c92a1e
    instance-state: running
    series: raring
    hardware: arch=amd64 cpu-cores=8 cpu-power=2000 mem=7168M root-disk=8192M
services:
  gccgo:
    charm: local:raring/gccgo-12
    exposed: false
    units:
      gccgo/0:
        agent-state: installed
        agent-version: 1.15.0.1
        machine: "1"
        public-address: ec2-54-253-4-102.ap-southeast-2.compute.amazonaws.com

You can also monitor the output of the build process itself using the juju debug-log command.

Grabbing the results

The gccgo charm has a number of configuration variables you can use to tweak the build process if necessary. The gccgo charm produces a tarball as its final result once the service moves to started state.

% juju get gccgo
charm: gccgo
service: gccgo
settings:
  prefix:
    default: true
    description: gccgo build prefix
    type: string
    value: /opt/gccgo
  tarfile:
    default: true
    description: gccgo final tarball
    type: string
    value: /home/ubuntu/gccgo.tar.bz2
  work:
    default: true
    description: gccgo build directory
    type: string
    value: /home/ubuntu/work

Now we know the location of the tarball, we can use the juju scp command to fetch it.

juju scp gccgo/0:/home/ubuntu/gccgo.tar.bz2 /tmp

Cleaning up

8 core virtual machines don’t come cheap, don’t forget to destroy this environment (or at least destroy the service and remove the machine) once you’re done.

# destroy service and remove build machine
% juju destroy-service gccgo
% juju destroy-machine 1    # from the output of juju status above
# or destroy the environment
% juju destroy-environment -y